Dave's 79 RS

  • Thread starter david.cordle
  • Start date
  • This site may earn a commission from merchant affiliate links like Ebay, Amazon, and others.

david.cordle

Veteran Member
Nov 18, 2010
561
Killeen, Tx
Ok, here goes... I've been wanting to start my project thread for a little bit now, but i couldn't see starting a thread till I started the project. I paid a little more for mine than what most are paying but I'm still happy with the deal, I gave $2500 for the car. Please bear in mind it ran and had a complete drive train when I bought it, Sold the drive train
(305/TH350) almost as soon as I got it home. My intent is to do a sort of pro street/touring hybrid. here are some pics before the front clip came off. This is orginal paint.

057.jpg


056.jpg


031.jpg


030.jpg


028.jpg


027.jpg


024.jpg


014.jpg


013.jpg


004.jpg
 
Last edited:
This site may earn a commission from merchant affiliate links like Ebay, Amazon, and others.

david.cordle

Veteran Member
Nov 18, 2010
561
Killeen, Tx
Progress

Trying to catch my thread up to my progress, thanks for the comments on the car ya'll but it's not all sunshine and rainbows!

passanger side under the battery tray
008-1.jpg


Battery tray, this is the worst spot on the car and every thing around it
015-1.jpg


Sometimes you just wanna kill people, look at the spectacular job some previous owner did removing the AC. I particularly loved their patch in the firewall. That is some sort of foam backer board
022-1.jpg


Ewwwww
051-1.jpg
 

david.cordle

Veteran Member
Nov 18, 2010
561
Killeen, Tx
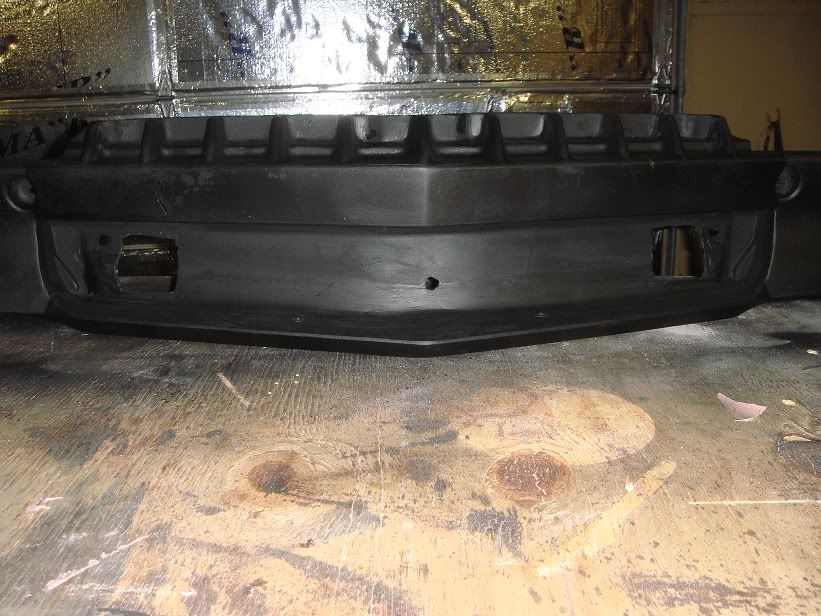
Bumper cushion

Here's where I'm at now, the front clip is off the car, cleaning up the fenders and getting them in primer. I'll pull the doors and do the same when their done. I disassembled the entire front bumper assy. and sent it for powder coat, along with both headlight buckets, core support and the marker light backing plates. found an awesome powder coat shop in the area that is doing all 19 pieces for $400. Will post pics when I get the parts back.

This is a excerpt from a thread I started in the body section the other day:

"Started a thread the other day about the rubber piece behind nose of the car or the bumper cushion if you will. Found a great product at Tasco, mine was tore and in pretty rough shape they recommended a Plastic repair kit from Evercoat (part# 100891), it's semi-ridged epoxy that cures and is sandable in about 30 min. The first 2 applications went easy enough, see attached pics will post more when finished."
019.jpg


020.jpg


021.jpg


004.jpg


002.jpg


"It took a grand total of 4 applications 2 on each side. The hardest part about this stuff is getting it out of the tube, lol. It's relatively easy to work with once you get it mixed but it starts to get tacky pretty fast. Recommend that if you're working a large area start small till you get used to it. I wasn't terribly worried about the finish since it's completely covered by the nose piece. Knocked it down with some 80 grit, wrapped some sand paper around a socket to get the curve right in the front, and shot it with some plastic spray paint to protect it. All in all, I'm pretty happy with the fix and the product. Thanks for the tip Crome Dome."

finishedbumpercushion.jpg
 
Last edited:

crome dome

Veteran Member
Oct 27, 2008
525
Round rock Texas
Thats a nice looking start you have there, I'm really startin to dig the RS paint scheme.
When you go to take the rusted bolts out of the battery tray, it helps a bunch to heat those bolts with a torch first.
 

david.cordle

Veteran Member
Nov 18, 2010
561
Killeen, Tx
Battery tray

I've already got the battery tray out. What I'm try'n to do now is drill the spot welds on the inner fender, so I can clean any rust where it overlaps. Wanna get the rust from that battery tray outta there before I send the inner fenders to powder coat. If it gets to be too much of a pain in the a** I'll get a new one for the right side.
 
Top